Follow @Pimp_my_Gimp
stitches: stitches' shadow:

background after masking:

layer mask
c2g: Pure awesomeness!! Simple desaturation: flat, boring...
Tip: Use c2g on any photo and it will look like a professional's work.
Follow @Pimp_my_Gimp
This image was inspired by the great short story "I have no mouth & I must scream". If you haven't read it, I strongly recommend it.
In order to make the final image we will use Grunge brushes & 1 grunge stock image, the totally AWESOME c2g gegl filter and as always layers and layer masks (can't do even the simplest photo manipulation without masking). This tutorial assumes you have basic understanding of layers and layer masks. If you don't, read these instructions.
Original image: Final image:
1. Fix the contrast of your original image. You can use used FX Foundry->Photo->Enchancement->auto contrast correction, that usually yields good results. You can use curves or levels if you prefer, depending on your photo. Do not heal any skin imperfections as we actually want them to stand out in the final image. The girl in our tutorial, called Mary, is 19, so she doesn't have any imperfections anyway...But I won't correct any camera artifacts either. Name the layer as "Girl".
2. Mask the image.
We will create a new background for our image, so we will have to get rid of the current one.
3. Draw the stitches
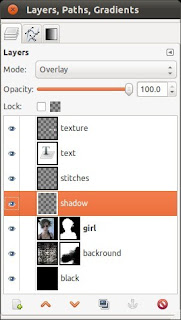
Create a new layers named "stitches" on top of the girl layer and use a small black round brush to paint them. Then apply the filter Noise->Pick with little randomization (5-15%) and only 1 repeat. It should make the strands look less smooth. They still seem flat though, so in order to make them look a bit more realistic we will add shadow. Create a new layer named "shadow", put it between girl and stitches layers, set mode to overlay and paint the shadows that the stitches would drop on the skin. Never forget to add shadows!
stitches: stitches' shadow:
stitches with shadows:
4. The new backround.
Create a new layer "black" and fill it with ...black.
and another layer "Backround" where we will paste the grunge backround image. I used this one. In order to make it look like the final image, add a layer mask (white/full opacity) and use a black grunge brush to give it a nice grungy "outline". You can find a gazillion grunge brushes (and much more!!) at DeviantArt or other sites. A nice brush set I use is "52 grunge brushes". For stock images try texturemate or cgtextures.

background after masking:

layer mask
Add a new layer "text" and write whatever you like. I used the font "Destroyed license plate". Then make a new layer "texture" on top of the "text" layer. Right click on the text layer and then click "Alpha to selection". Select the texture layer and paint it with the same grunge brush to give it a similar style of texture.
6. c2g
Use Tools->GEGL operation->c2g. This filter will give our image an awesome b&w noisy horror look!! c2g filter FTW!!! Experiment with the tool's settings, as it will give different (but always awesome) results. Its defaults are just as good. Compare this to a simple desaturation:
c2g: Pure awesomeness!! Simple desaturation: flat, boring...
Tip: Use c2g on any photo and it will look like a professional's work.
I like to add a bit of red to all my B&W images, so i made my signature red. I used "Destroyed license plate" font again.
I would really appreciate suggestions on how to make this image better and more realistic. So any pro user reading this, please share your knowledge with me and make your own tutorials as well, so other can improve their skills. Please do not hesitate to comment. Also become a member of Gimptalk to find tutorials, resources and ask questions about GIMP. I use the nickname "Pimp my Gimp". I will publish more tutorials soon (some will be more advanced than this, I promise. Others will be for beginners), so stay tuned at Facebook, twitter, youtube channel or subscribe to the rss feed.
PS: You can find Mary at her blog and twitter. Maybe hire her as well, as she is a dancer and theatrical actress/writer at her University!


No comments:
Post a Comment